





A Reliable Unagi Kabayaki Recipe That Keeps Frozen Pre-Cooked Eel Moist and Glossy
You pull a vacuum-packed unagi fillet out of the freezer, thaw it, throw it under the broiler — and it comes out dry, curled, and pale where it should be lacquered dark brown. Sound familiar? That's the single biggest complaint we hear from home cooks and small restaurant buyers alike. The good news: a proper unagi kabayaki recipe for pre-cooked eel isn't complicated once you understand what's actually happening to the fish during reheating. This guide covers the exact steps, the common failure points, and how to build that classic glazed finish without turning the eel into jerky.
Why Pre-Cooked Unagi Behaves Differently Than Raw Fish
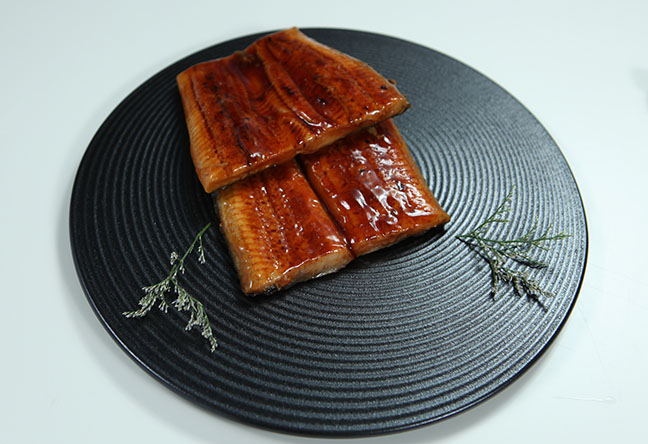
Pre-cooked unagi has already been steamed and grilled once at the processing stage — that's what "kabayaki" means, technically: split, boned, skewered, and grilled with a soy-mirin glaze. When it arrives frozen, the eel is fully cooked. Your job isn't to cook it again from scratch. Your job is to rewarm it without stripping out moisture, then rebuild the glaze that melted or dulled during freezing and transport.
This distinction matters because most kitchen disasters come from treating pre-cooked unagi like a raw fillet — blasting it with high, dry heat for too long. Raw fish tolerates aggressive heat because you're cooking proteins for the first time. Pre-cooked eel has already gone through that process, so a second round of high heat just evaporates the moisture that's left.
What Makes Good Frozen Kabayaki in the First Place
- Fat content — freshwater eel with good marbling reheats more forgivingly than lean stock.
- Glaze thickness at freezing — a properly tare-coated fillet before flash-freezing holds moisture better during reheat.
- Vacuum-seal quality — freezer burn on a poorly sealed pack means dry patches no amount of glazing will fix.
If you're sourcing in bulk, ask your supplier about their freezing process and tare coating step — it affects your finished plate more than any reheating trick. You can review specifications on our unagi kabayaki product page before placing an order.
The Two-Stage Warming and Glazing Method
This is the core technique that separates a soggy, steam-table result from something that looks and tastes like it came off a robata grill. The idea is simple: separate moisture restoration from surface caramelization into two distinct stages. Trying to do both at once — heat the eel and build a lacquer finish in one pass — is the number one reason kabayaki turns out dry or unevenly glazed.
Stage One: Gentle Steam-Warming
- Keep the eel in its vacuum bag if it's boil-safe, or wrap it loosely in foil.
- Warm in a steamer basket or a pan of barely simmering water at around 75-80°C (167-176°F) for 6-8 minutes for a standard 120-150g fillet.
- Check the internal temperature reaches at least 60°C (140°F) before moving to stage two — this rehydrates the flesh from the inside out.
Checkpoint: the fillet should feel warm and flexible, not stiff. If it's still cold in the center, extend steaming in 2-minute increments rather than jumping to direct heat.
Common failure: skipping this stage and going straight to the broiler. Without pre-warming, the outside chars before the inside even thaws — that's the dry, tough texture everyone complains about.
Stage Two: Glaze-and-Sear Under Direct Heat
- Remove the eel from its wrapping and pat the surface dry.
- Brush a thin layer of eel sauce (unagi tare) across the skin and flesh side.
- Broil skin-side up, 10-12cm from the heat source, for 90 seconds to 2 minutes.
- Pull it out, brush a second thin coat of tare, and broil again for another 60-90 seconds until the surface bubbles and darkens.
- Repeat a third light glaze only if you want a deeper lacquer — but never exceed 4-5 total minutes under the broiler.
Checkpoint: the glaze should look glossy and slightly caramelized at the edges, not blackened. If it's smoking, your heat source is too close or too hot.
Common failure: applying one thick coat of sauce instead of two-to-three thin layers. Thick glaze burns on the outside before it sets into a proper lacquer, and it slides off onto the tray instead of clinging to the fillet.
| Stage | Goal | Temperature / Time | What to Watch For |
|---|---|---|---|
| Stage 1 – Steam Warming | Restore internal moisture | 75-80°C, 6-8 min | Internal temp reaches 60°C, flesh feels pliable |
| Stage 2 – Glaze & Sear | Build lacquered surface | Broil, 90 sec x 2-3 passes | Glossy bubbling glaze, no smoking or blackening |
This method is essentially how professional kitchens handle bulk frozen kabayaki for donburi service — reheat gently, then finish hot and fast in short bursts. It's the same principle behind our recommendations in this kabayaki sauce article, where sauce consistency is discussed in more detail.
Building the Unagi Rice Bowl — Assembly That Doesn't Waste the Glaze
A great unagi rice bowl depends on timing as much as technique. If you plate the eel too early, steam from the rice softens the glaze into a wet film instead of a glossy coat.
- Cook short-grain rice separately and keep it warm — don't let it sit under the eel while you're still glazing.
- Slice the fillet into 2cm strips only after the final broil, never before — pre-slicing exposes more surface area and dries it out faster.
- Drizzle a small extra spoon of warmed tare over the rice itself, not just the eel, for the traditional donburi flavor balance.
- Add pickled ginger or a scatter of scallion right before serving — moisture from garnish sitting too long will dull the glaze.
For more topping combinations, our guide on eel rice bowl toppings covers seven variations worth trying if you want to move beyond the standard preparation.
Common Mistakes That Ruin Frozen Kabayaki
| Mistake | Why It Happens | Fix |
|---|---|---|
| Thawing at room temperature | Uneven thaw causes bacterial risk and mushy edges | Thaw overnight in the refrigerator, or use the sealed-bag cold water method for 20-30 minutes |
| Skipping the steam stage | Cook straight from freezer to broiler | Always steam-warm first — see Stage One above |
| One thick glaze coat | Assumed "more sauce = more flavor" | Apply 2-3 thin coats during short broiler passes |
| Broiling too long in one pass | Trying to get color and warmth simultaneously | Separate warming and glazing into two stages |
| Refreezing after partial thaw | Buying in bulk without portioning | Portion and vacuum-seal before freezing individual servings |
Frequently Asked Questions on Reheating Pre-Cooked Unagi
How to cook pre-cooked unagi kabayaki?
Steam-warm the sealed or foil-wrapped fillet first at 75-80°C for 6-8 minutes, then finish under a broiler with 2-3 thin coats of tare, about 90 seconds per pass. This two-stage approach is the reliable method across most Japanese eel preparation guides and professional kitchens alike.
How do you reheat unagi without drying it out?
The moisture problem almost always comes from skipping the gentle warming stage. Direct high heat on a cold or half-thawed fillet forces the surface to cook faster than the center can warm, pulling water out along the way. Always warm through gently before applying any direct heat or glaze.
How to glaze frozen grilled eel?
Thaw and warm the eel fully before glazing — cold glaze on a cold fillet won't caramelize evenly. Apply the kabayaki glaze in thin layers, broiling briefly between each coat rather than one heavy application. This builds the lacquered look without burning the sugars in the tare.
Sourcing Considerations Before You Order in Bulk
If you're buying for a restaurant or retail program rather than home cooking, a few sourcing questions save headaches later:
- Ask whether the eel is freshwater eel (unagi) or ocean eel (anago) — they behave differently when reheated and have different fat profiles.
- Request documentation on freezing temperature and cold-chain handling from farm to shipment — this affects moisture retention more than any kitchen trick.
- Order a trial case before committing to volume, and test the two-stage method above on that batch specifically.
You can see our farming and processing background on the eel farm page, and review quality control details via our eel lab page. For a broader look at our supply capabilities, our frozen seafood line covers related product categories as well.
Freshwater eel farming and grading practices are also documented by broader industry bodies — the Food and Agriculture Organization publishes aquaculture standards relevant to species like Anguilla japonica if you want deeper technical background.
Get a Sample Before You Commit to a Recipe Program
If you're developing a menu or retail line around frozen unagi, testing texture and glaze behavior on an actual sample batch beats guessing from a spec sheet. Reach out to our team for a sample of our pre-cooked kabayaki and tare sauce, and we'll walk you through handling notes specific to that batch.
 WhatsApp
 sales@chinaeels.com
 +8619937922411