

This Unagi Nigiri Recipe Keeps the Rice Base Intact Under a Heavy Glaze
Your rice ball collapses the moment you lift it. The eel slides off, the glaze pools on the plate, and the bite falls apart before it reaches your mouth. That's the complaint we hear most about home-made unagi nigiri. The fish is usually fine — ready-grilled, glossy, properly caramelized. The problem sits underneath, in the rice. A working unagi nigiri recipe isn't really about the topping. It's about building a base that can carry a strip of glazed eel, absorb some sauce moisture, and still hold its shape on the plate.
Why Unagi Nigiri Falls Apart Before It Reaches the Plate
Three things usually go wrong, and they compound each other. First, the rice is too hot or too cold — above roughly 40°C (104°F) it turns sticky and overworked; below 30°C (86°F) the starch stiffens and won't bond. Second, the hands are either bone-dry (rice tears and sticks to skin) or soaking wet (grains dissolve into paste). Third, the eel itself is heavier and more slippery than raw fish toppings, because kabayaki carries a sauce glaze on top of its own moisture. A base shaped for plain sashimi nigiri often can't take that extra weight.
- Rice cooked too soft collapses under any topping weight.
- Over-squeezed rice turns dense and chalky, losing the light texture a unagi nigiri recipe depends on.
- Glaze applied before shaping soaks into the rice and weakens the structure from the first bite.
How Hand Moisture, Rice Portion Size, and Gentle Pressure Build a Base That Holds
This is the part most home cooks skip, and it's the actual mechanism behind a nigiri base that supports frozen unagi kabayaki without flattening the sushi rice grain. Three variables interact — moisture, portion, pressure — and each has a working range.
| Variable | Too Little | Right Amount | Too Much |
|---|---|---|---|
| Hand moisture (tezu) | Rice sticks to palm, tears when released | Fingertips lightly damp with vinegar water | Rice turns soggy, grains fuse into paste |
| Rice portion | Under 15g — base too thin to carry glaze weight | 18-20g — enough mass to hold a kabayaki strip | Over 25g — oval sits too tall, eel slides off center |
| Shaping pressure | One light touch — rice falls apart on the plate | Two to three gentle presses, bonding edges only | Four-plus firm squeezes — rice compresses into a dense block |
The logic is simple: damp fingertips let rice release cleanly instead of tearing; a 18-20g portion gives enough surface area for eel to sit flat without toppling; and light pressure bonds grains at the contact points while leaving air pockets inside, which is what keeps nigiri tender instead of compacted. This combination applies to warm, freshly cooked rice — it does not apply to rice that's been refrigerated and gone hard, which needs re-steaming before shaping works at all.
Step-by-Step Unagi Nigiri Recipe Assembly
- Cook and cool rice to handling temperature. Aim for 35-37°C. Checkpoint: rice should feel warm, not hot, to bare fingers. Common failure: shaping straight out of the cooker — steam makes grains collapse under pressure.
- Dip fingers in tezu (water with a little rice vinegar). Checkpoint: fingertips glisten but don't drip. Common failure: dry hands cause tearing; dripping wet hands dissolve the surface starch.
- Scoop an 18-20g portion with a rice paddle. Checkpoint: roughly the size of a large thumb joint. Common failure: eyeballing portions leads to oversized, unstable mounds.
- Shape into an oval cylinder with two to three presses between palm and fingers. Checkpoint: rice holds form when released but a single grain can still be pulled free without crumbling the rest. Common failure: repeated squeezing to "make sure it holds" — this is what over-compresses the grain.
- Lay the glazed eel strip across the top and press only at the edges to mold it to the curve. Checkpoint: eel wraps the rice without being pushed into it. Common failure: pressing down the center flattens the rice dome and breaks the structure underneath.
- Brush extra sauce on last, right before serving, not during shaping. Checkpoint: glaze stays glossy on the surface. Common failure: glazing early lets sauce soak downward and softens the rice base within minutes.
Common Mistakes That Crack the Rice or Flatten the Grain
- Using cold, fridge-stored rice without re-steaming — it won't bond no matter how much pressure you apply.
- Skipping tezu water entirely because "my hands are clean enough" — dry friction tears the rice surface.
- Cutting eel strips too thick for the rice portion, which unbalances the nigiri and causes it to tip over on the plate.
- Reheating eel at high heat right before plating — this thins the glaze and makes it run onto the rice before you even shape the base.
- Shaping a whole batch in advance and leaving it uncovered — exposed rice dries out and refuses to bond with the next press.
Choosing Ready-Grilled Eel for This Recipe — Frozen Kabayaki vs DIY Glazing
Most home cooks start with raw eel and try to grill and glaze it themselves, which adds variables you don't need when the actual challenge is rice shaping. Comparing the two approaches side by side:
| Approach | Prep Time | Consistency | Best For |
|---|---|---|---|
| Raw eel, self-grilled and glazed | 45-60 minutes, requires skinning/deboning skill | Varies with skill level and heat control | Experienced cooks who want full control over glaze layers |
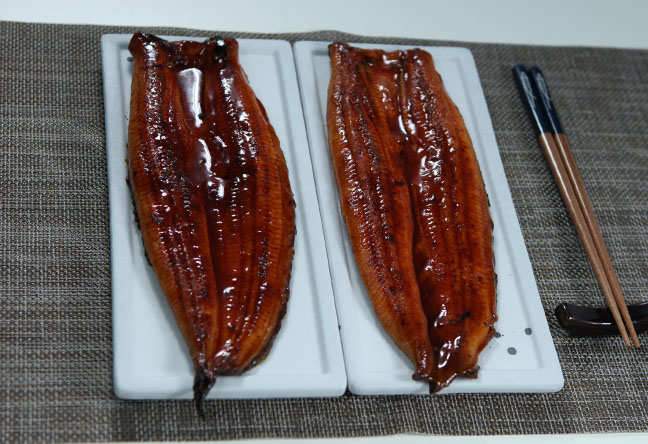
| Ready-grilled frozen unagi kabayaki | Thaw plus a short reheat, roughly 10-15 minutes | Even color, pre-set texture, reliable from batch to batch | Home cooks focused on nigiri shaping, not eel preparation |
If the goal is a repeatable unagi nigiri recipe for weeknight dinners or a small dinner party, starting from ready-grilled frozen unagi removes the grilling variable so you can focus entirely on the rice technique above. This doesn't apply if you specifically want to control your own soy-sauce layering from scratch — in that case, raw eel and a from-scratch glaze gives more room to adjust, and our guide on kabayaki sauce covers that process.
Thawing and Reheating Eel Before Shaping Nigiri
A specific scenario we recommend: move a sealed frozen kabayaki fillet from freezer to refrigerator the night before, letting it thaw slowly over 8-10 hours. Warm it gently in a covered pan with a spoon of eel sauce (unagi tare) over low heat until just warmed through, then rest it two minutes before cutting into nigiri-sized strips. Nancy Chen, our ISO 22000 and HACCP-certified quality specialist, notes that slow, refrigerated thawing is the detail most home kitchens skip — rushing it under warm water raises surface temperature unevenly and increases the window where bacteria can grow, a basic principle behind HACCP-based handling. This matters more for eel than for rice, since the fish carries the higher food-safety risk once thawed.
Once cut, the eel strip should go onto the rice base immediately while the rice is still warm enough to mold but not hot enough to melt the glaze. If you're planning a larger spread, the same thawed fillet works well sliced into rice bowl toppings or rolled into maki alongside your nigiri plate.
A Quick Buyer's Checklist Before You Shape
- Is the eel fully thawed and warmed, not still cold in the center?
- Is your rice at handling temperature, not fresh off the boil?
- Do you have vinegar water ready for tezu, not just plain water?
- Are your eel strips cut to match an 18-20g rice portion, not oversized?
- Will you glaze last, right before serving, instead of during shaping?
If you're sourcing eel for a restaurant menu rather than a single home batch, our team can walk you through portion-cut specifications — strip-cutting, chunk-cutting, or sushi slices — that match different nigiri formats. Reach out for a sample or spec sheet and we'll match the cut to your kitchen's shaping process.